If you enjoy this how-to guide and decide to grab one of the items listed, please consider clicking through one of my links before you buy. I earn a small commission at no cost to you, which helps support this site and keep these informative guides coming. Thanks!
We’ve all seen the advice on the discussion groups on how to use a compressor plugin:
“You need to use more compression on your vocal tracks.”
“That snare is way over-compressed.”
“If it’s not loud enough, add more compression.”
Though well-meaning, advice like this doesn’t go into enough detail to really be of use, especially for the beginner. You know you need compression, but do you know how to use a compressor plugin?
A well-tuned compressor is arguably the most important plugin you will use on your tracks. Most engineers use a compressor – or multiple compressors – on nearly every track, buss, and even the master. Using compression correctly can easily make or break a good mix. Properly setting up your compressor plugin for the individual task at hand is an essential part of nailing your mix.
Every DAW comes with a compressor plugin – some with multiple – and there are literally hundreds of third-party compression plugins out there ranging in price from free into the hundreds of dollars. Before you can know which one to buy, you’ll need to know how a compressor plugin works, and how you use it. Let’s explore.
(This is a beginner’s guide to compression. If you’re just getting started with home studio production, you may want to check out my guide How To Set Up Your Home Studio before diving into this one. If you’re already familiar with how compression works, you may want to skip ahead to a more advanced topic, like How To Use Sidechain Compression.)
What Is Compression?
At the most basic level, you use a compressor plugin to ‘squash’ your audio signal. (Hence the clever name ‘compressor.’) Compressors take the input signal and reduce the overall dynamics; loud sounds get quieter, quiet sounds get louder. But a compressor has far more functionality than that, which we will detail in depth.
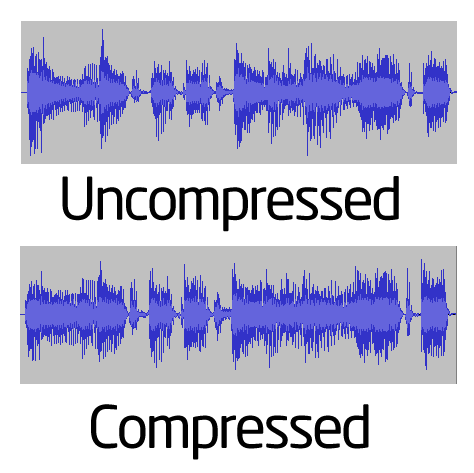
Here’s a basic example:

The two waveforms above are the exact same performance, but the second has had a compressor applied. Notice how the overall waveform has fewer peaks and valleys and looks flatter overall, and the sections that were smaller (quieter) are now bigger (louder), and vice-versa.
Why Do I Need Compression?
Simply put, compression can make your tracks sound more natural and pleasing to the ear, and ultimately affects which tracks ‘stick out’ in your final mix. Here are clips of the performance from the example above, with and without compression added:
The difference is subtle, but notice how the second sample sounds more toned down. That fuller sound allows the waveform to sit better in the mix instead of ‘cutting through’ the overall mix. Also, notice how the first strum of the guitar, also known as the ‘transient,’ was the loudest part in the first sample. In the second sample, it sounds much quieter. This would be a good compression setup for a rhythm guitar part, for example, since the idea is not to overpower the vocals, lead guitar, snares, etc., and just add fullness to the overall mix.
What Do All These Knobs Do?
OK, so now you have a basic understanding of compression. However, when you first look at a compressor plugin it can be a little intimidating because of the sheer number of controls. Don’t worry, we will go over each one in detail. Then, in the next section, we will talk about the most common settings used for different instruments and purposes.
Threshold
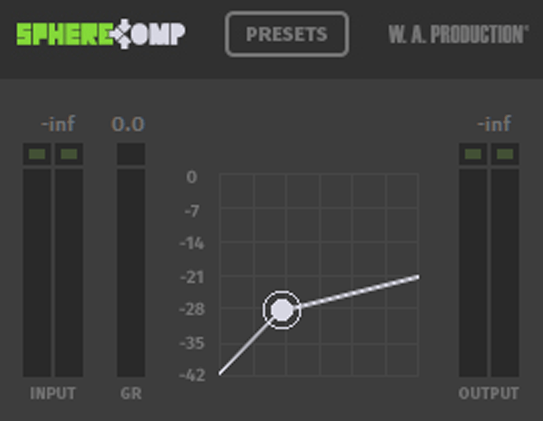
The threshold, measured in decibels (db), controls when the compressor kicks in. Here’s a screenshot from one of my favorite track compressors, SphereComp by W.A. Production:

In this example, the threshold is set to -28dB. As a result, input levels below -28dB are not compressed, while levels above -28dB are. The ratio determines the amount of compression that is applied.
Ratio
The ratio knob controls how much compression is applied to peaks that go above the threshold. The ratio is expressed in a mathematical ratio, like two-to-one (2:1) or four-to-one (4:1). That means that any peaks that go above the threshold are compressed by two times, four times, etc. Here’s a graphical representation, again from SphereComp:

As you can see, the 1:1 ratio is not compressed at all, while 8:1 is heavily compressed. At the 8:1 setting, for every 8 decibels above the threshold, the signal is compressed to only 1 decibel above. The math is confusing, but rest assured that higher ratios mean more compression. (Once, before I fully understood compression, I accidentally left the controls on my compressor set to 1:1. I spent longer than I would like to admit trying to figure out why the sound wasn’t compressing. I even restarted my DAW and my computer trying to ‘fix the bug’ before I finally realized what I had done, and felt really, really dumb.)
Attack and Release
So we’ve set our threshold and ratio, so now we’re compressing our signal. But to really fine-tune the compressor for the particular track we’re using it on, the attack and release knobs are invaluable. Ultimately, these controls allow the input signal to retain some of the punch and sustain – the more desirable dynamics of music – while still sitting well in the mix. Without attack and release, we are in danger of squashing the signal to the point that it no longer sounds musical.
What Attack and Release Do
The attack knob controls how quickly the compressor kicks in after the signal reaches the threshold, and is measured in time, typically tiny fractions of a second. Conversely, the release knob controls the rate at which the compressor is allowed to fade out. So as the signal gets louder and hits the threshold, the attack control allows it to rise above the threshold freely for a short interval, then applies compression and attenuates the signal. The release does the opposite, fading the compression out over time, eventually returning the signal to full strength as it falls back towards the threshold.
How to Use Attack and Release
How is this useful? If you are familiar with how tube rectifiers in higher-end or vintage guitar amps work, you may already know the answer. Vacuum tubes do not have the near-instantaneous charge time of modern transistors; they take a fraction of a second to reach full power. As a result, If you strum your guitar loudly while using an amplifier with a tube rectifier, the signal is naturally compressed, which is an extremely pleasing and desirable sound.
To recreate this sound with a compressor plugin, set a short attack and a short release. The compression kicks in immediately, emulating the sound of a tube not at full charge, then a few moments later the compression fades out as the tube ‘catches up’ and hits full power. On the other hand, for a snare drum, a slower attack is preferred, since the distinct ‘crack’ of the snare is what we want to hear through the mix, and the reverberation of the drum is often what we want to compress. More on specific use cases in a bit.
Knee
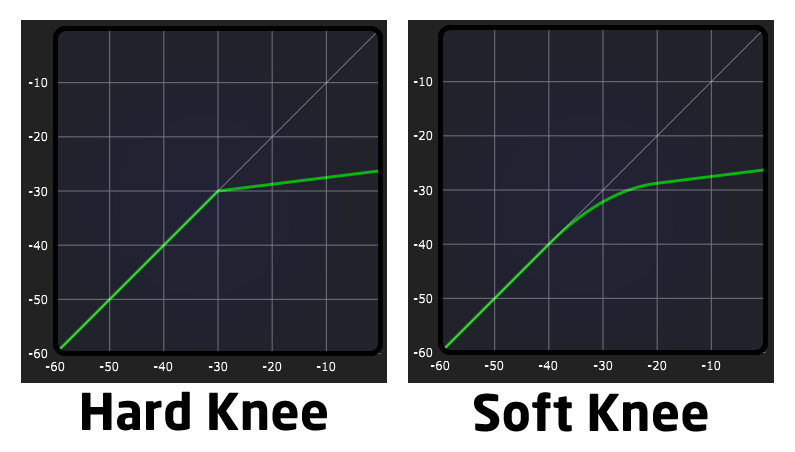
The knee knob controls at which point the compressor kicks in. Setting a sharp knee kicks in the compressor at exactly the moment the signal reaches the threshold while setting a relaxed knee fades in the compression starting slightly below the threshold and coming into full strength slightly above.

A soft knee can create a more pleasant compression on vocals, guitar, and other melody tracks where the desire is to rein in the transient, while a hard knee is often better for drums. Many compressor plugins don’t have a knee control, which is why it is important to understand a fundamental difference between hardware and software compressors. Because hardware compressors use electronic parts – sometimes even vacuum tubes – to attenuate the input signal, there is often a softer knee hard-wired into the circuitry. Software compressors without a knee control tend to have a harder knee, however, if a compressor plugin is designed to emulate a particular hardware compressor with a soft knee (LA-2A or 1176 emulators, for example) they should have a softer knee to match.
Gain/Output
The gain knob (sometimes simply called the output) controls how much total wet signal comes out of the compressor. Setting the gain properly on each individual track is an essential part of proper mixing technique, so it’s vitally important that you be mindful of how much signal is passing through to the buss or master. If an input signal is properly gain staged when recording, most engineers prefer to keep the compressor output and input set to a similar level. For example, if a dry signal on a track has a peak of around -12dB, the compressed signal would also have a peak of around -12dB. This allows plenty of headroom for the final mixing and mastering process.
Other Common Controls
Some compressors have even more control. Other common controls include auto gain, dry/wet, multiband frequency controls, and sidechaining. Auto gain automatically sets the gain to whatever the plugin programmer thought was best based on an algorithm – and frankly, I don’t recommend it in most cases. Dry/wet can be useful for a very subtle compression that still allows some of the uncompressed signal to shine through. Multiband frequency controls apply the same principles of compression to specific frequency ranges, which can be great for preserving or removing particular timbres from a signal, like the squeak of a kick drum pedal, for example. Sidechaining is a fairly in-depth topic that deserves its own tutorial, so I won’t cover it here but know that it is a powerful and useful feature that is worth exploring once you’ve mastered compression. Check out my guide How to Use Sidechain Compression when you’re ready.
How Do I Use Compression?
Now that you have a complete understanding of compression and what all the controls do, how do you use it? Well, all things in music production are subjective, and the ‘correct’ settings for a compressor are no different. You will want to tune the compressor on each track and buss individually in order to produce the most musical and dynamic sound that will still fit neatly into your mix. That said, here are some common settings that you may find useful in a handy chart.
| Instrument | Ratio | Attack | Release | Knee |
| Electric Guitar | 2:1 | Fast | Fast | Soft |
| Acoustic Guitar | 2:1 | Fast | Slow | Soft |
| Bass | 6:1 | Slow | Slow | Soft |
| Piano | 4:1 | Fast | Slow | Soft |
| Vocals | 4:1 | Fast | Slow | Soft |
| Kick | 6:1 | Slow | With beat | Hard |
| Snare | 4:1 | Slow | With beat | Hard |
| Toms | 4:1 | Slow | With beat | Hard |
| Overheads | 8:1 | Slow | Fast | Soft |
| Room | 8:1 | Fast | Slow | Soft |
I find that saving each of these settings as a preset, then going in and fine-tuning the individual settings to match the performance gives the best balance between a quick workflow and a desirable end result. Notice that there are no threshold or gain settings. That’s because you can’t really set those ahead of time unless you are using the exact same mics in the same room in the same location every time, and even then I can’t tell you what the right numbers will be, you’ll have to watch the meters and figure that out based on the performance. All this being said, these settings might go right out the window based on the genre of music you make, the performances, or the individual sound you are going for with your mixes. Your mileage can and will vary.
Common Mistakes
When browsing discussion groups or listening to other people’s mixes, I often hear the same few basic mistakes with compression. I promise you that I have made every one of these mistakes at one point, so my goal with this section is not to criticize, but to point you in the right direction from the start.
Too Much Gain
As I mentioned in the section on gain/output control, in most cases it’s best to leave ample headroom on your individual tracks for the mixing and mastering process. Often times I hear mixes where every single track is compressed to the max, resulting in mixes that are squeezed into bricks and sometimes even clipping. In short, there’s nothing pulling specific parts out of the mix because there’s no room for sections of the individual tracks to breathe.
If you listen to a professionally-produced track from one of your favorite artists, you will hear that certain parts naturally stick out of the mix at different times. When the singer isn’t singing, the guitars stick out, but when the vocals come back in the guitars drop down some to give the vocals room to shine. Compressing every track to 0dB leaves no headroom in which to mix, reducing the chance of achieving a good mix to, well, zero.
Compressing Out The Performance
One of the things that makes music interesting and fun to listen to is the dynamics. Think about some of your favorite songs. I bet many of them have sudden, heart-pounding crescendos that give you goosebumps. Well, it’s hard to get goosebumps from a track that starts loud, stays loud and ends loud. In many cases, less is definitely more. Be careful not to compress each track so much that the natural dynamics in the performance completely disappear.
Not Learning One Compressor Well
As I mentioned at the beginning, there are hundreds of different compressor plugins out there. When you don’t get the sound you want out of one, it’s tempting to try a different one. That’s not to say that there aren’t uses for more than one compressor – many engineers even use more than one compressor on the same track, especially for vocals – but as a beginner, it’s best to pick one or two compressors and master them before learning any others. Hopping from one compression plugin to another while trying to find the right sound is usually a waste of time since odds are the first one was quite capable of achieving the sound you wanted if tuned correctly.
The Bottom Line
When I first started learning home music production in the late 90s, I read a few forum posts online, then dove in head-first trying to make listenable mixes. I am not ashamed to admit that for a long time I failed miserably. Listening back to some of those early mixes now, nearly every single one is plagued by issues caused by not understanding how to use a compressor plugin properly and how to gain stage my tracks.
It wasn’t until I took the time and put in the effort to research proper recording techniques that I started to produce tracks that I wasn’t embarrassed to share, and only after years of experience was I able to create things in my home studio that people actually wanted to hear. There are no shortcuts, but hopefully, this article can at least serve to give you a head start on your path to making dynamic, well-compressed tracks and mixes.

