If you enjoy this how-to guide and decide to grab one of the items listed, please consider clicking through one of my links before you buy. I earn a small commission at no cost to you, which helps support this site and keep these informative guides coming. Thanks!
One of the biggest complaints I hear from home studio enthusiasts about the mixing and mastering process is difficulty getting their vocals or melody instruments to “sit in the mix” and not be drowned out by drums, bass, or other rhythm instruments. There are many common methods used to combat this problem, from volume automation to precision EQ. A favorite method of many producers is sidechain compression. Today we’re going to learn how to use sidechain compression, what it is, and hear an example of sidechain compression in use.
(Sidechain compression is a more advanced topic and requires working knowledge of how a compressor works, so beginners should consider checking out my guide on How to Use a Compressor Plugin before diving into this one. Or, if you’re just getting started with home music production, you may first want to check out my guide on How To Set Up Your Home Studio.)
What is Sidechain Compression?
As we know, compression is used to squeeze down your audio signal and reduce dynamics, making louder sounds quieter and vice versa. The compressor, whether it be hardware or software, watches the strength of the input signal and reduces any signal that goes above the threshold by a ratio of 2:1, 4:1, 8:1, etc. So if the threshold is set to -30dB and the ratio is set to 4:1, a -26dB signal will be reduced to -29dB. The loss in volume is made up through the gain control, therefore boosting quieter sounds as well.
Sidechain compression acts upon the audio signal in the same way, with one very cool difference: Instead of using the original signal’s levels to trigger the compressor, the levels of a secondary signal are ‘sidechained’ to the compressor. Here’s an illustration:
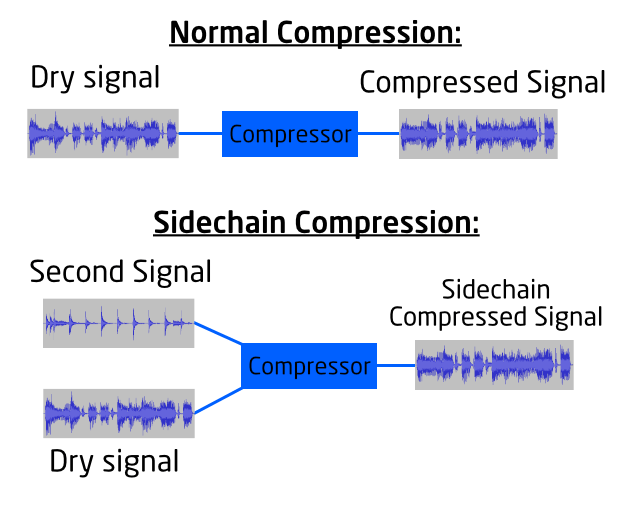
The original signal is acted upon by the compressor using the input from the second signal, therefore only compressing the original signal only when the second signal rises above the threshold.
Why Do I Want Sidechain Compression?
As mentioned above, sidechain compression is used to help vocals, melody instruments and or other signals that you want to stick out to sit well in your mix without significant changes in EQ or volume. It allows for a more natural-sounding dip in the volume of the sounds that are supposed to stay in the background, therefore adding a subtle lift to the parts that you want to stick out.
Before we go any further, let’s hear an example. Here’s a basic mix with rhythm and solo guitars, bass and drums:
… now here’s that same exact sample with sidechain compression applied to the rhythm guitar and bass tracks:
In the second sample, you can hear how the sidechained compressor allows the solo guitar to gain the foreground without a shelf in EQ or dramatic volume change in the rhythm instruments. When the solo guitar isn’t playing, however, the bassline and rhythm guitar regain the foreground.
How do I set up Sidechain Compression?
To set up sidechain compression, you need a few things:
- A compressor that supports sidechaining. Black Rooster Audio KH-COMP1, Fabfilter Pro-C 2, Arturia Comp FET-76 and 6030 Ultimate Compressor HD are some popular examples, but there are many. In this guide, I’ll be using SphereComp by W.A. Production. Most DAW software also comes with at least one sidechain-able compressor built-in, like the default compressors in Pro Tools, Ableton, or Studio One, ReaComp in Reaper, etc.
- A DAW that supports track routing. (I can’t think of a single one that doesn’t.)
- Two audio signals.
Once you have all of the above, you’re ready to sidechain. Let’s get started.
Step One – Add the Compressor
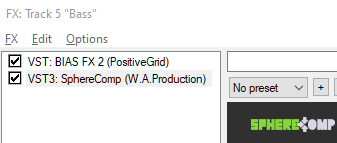
Go to the track or tracks that will be compressed (the one that will be compressed into the background, not the one that you want to stick out) and add the compressor plugin. This is where setting up your tracks into busses or groups can be particularly useful since you can apply sidechain compression to multiple tracks without having more than one instance of your compressor loaded. Here’s a screenshot from the audio example above – as you can see, I have added SphereComp to the Bass track:
Step Two – Enable Sidechaining
Once you have the compressor on the tracks, you’ll want to enable sidechaining. This will vary based on the plugin you’re using. Here’s a screenshot from SphereComp:
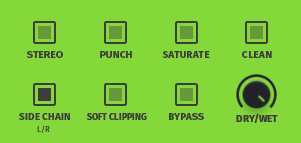
As you can see, in SphereComp it’s as simple as ticking the Side Chain button to enable sidechain mode, which is limited to mono operation. Some more advanced compressor plugins like Arturia Comp FET-76 allow enhanced stereo sidechain controls and mid/side compression.
Step Three – Add the Routing Path
Now that we have the compressor loaded onto the correct tracks, we need to tell the compressor which signal to use to trigger compression. To do this, we’ll need to route the signal from our sidechain track to the tracks that will be compressed. The signal routing process is different for each DAW; if you haven’t yet learned how to do it in your preferred DAW it’s definitely worth the time to learn as it’s an important technique for the mixing and mastering process.
There are many ways to route a track in Reaper, but here’s the simplest. Click the Routing button on the track that you want to route to and it will open a track routing window. From there, go to the Receives dropdown and select the track that you want to route from:
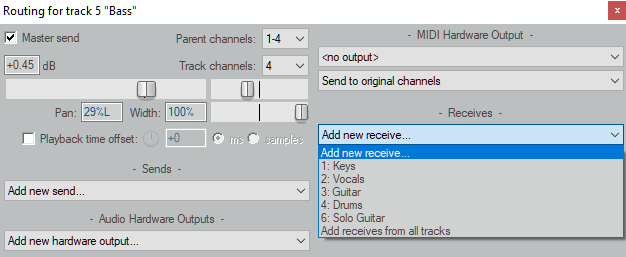
As you can see, I’m on the Bass track, and I want the bass to compress every time the Solo Guitar track goes above the threshold, so I’m going to select Solo Guitar. This opens up a bunch of options for how the signal will be routed. There’s an arrow at the bottom that shows the audio output of the sending track and the audio input of the receiving track on either side of an arrow. When I set the dropdown on the receiving end of the arrow to 3/4, like this:
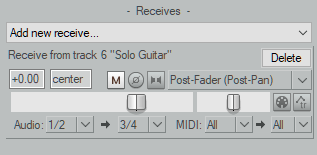
…the primary outputs of Solo Guitar will now route to the Bass track’s auxiliary outputs. It’s important to understand that the Solo Guitar track will not be affected and will still play normally, we’ve just added a connection from one track to the other. Think of it as a line out, like on a guitar amp. The guitar amp will still play, but the dry signal can be used elsewhere.
(One important thing to note is that this will also route MIDI signals, so if you’re doing this on one or more MIDI instrument tracks, you’ll want to change the MIDI input to “None.” Otherwise, the MIDI notes from one instrument will transfer to the other.)
Step Four – Change the Inputs
By default SphereComp uses the signals from the track it’s on to trigger the compressor. Clicking the Side Chain button tells SphereComp that instead of passing the left and right channels through the compressor, instead, we want to listen to the right channel for a trigger signal and apply compression only to the signal going into the left channel. If we don’t change the track inputs, the Side Chain button doesn’t do anything, since SphereComp is still listening to the left channel of the original signal to compress the right channel.
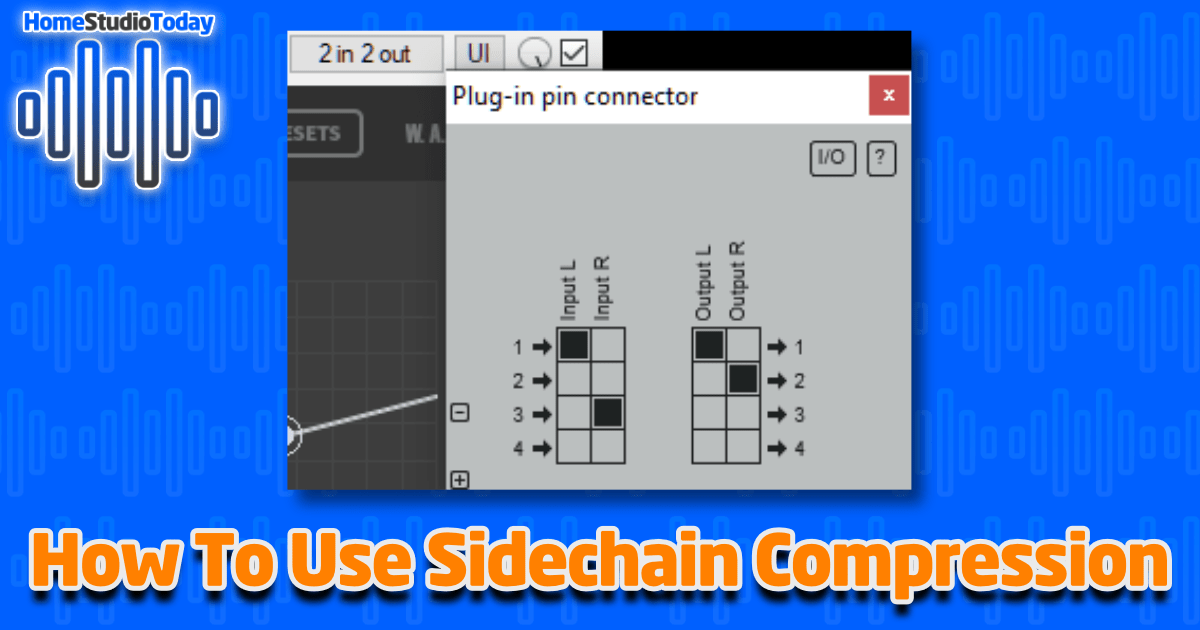
In Reaper, every track has a plugin pin connector option at the top of the plugin window. When I click the button marked “2 in 2 out,” it opens the plugin pin connector dialog:
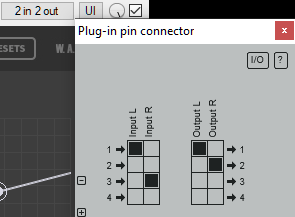
By default, the two stereo inputs and outputs of a plugin in Reaper are set to 1-Left and 2-Right. As you can see I have simply changed the right channel input to 3, which tells SphereComp to use the Solo Guitar that we routed in the last step to 3/4 as the right channel input. Now when I play my track, here’s what I see:
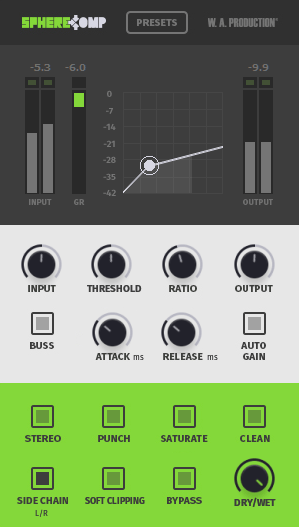
Success! Any time the solo guitar rises above the threshold, as visible on the right input channel meter, the compressor kicks on, and the overall output of the bass is compressed as displayed on the GR (gain reduction) meter. We have now applied sidechain compression to our bass track. Now, all I need to do is repeat the steps above for the guitar track and any other tracks that I want to compress when the solo guitar is playing. In Reaper, I just set up another route on the Guitar track from the Solo Guitar track, drag SphereComp to the Guitar track to duplicate the settings – including the sidechain setup – and I’m good to go.
The Bottom Line
Sidechain compression is an invaluable tool for the mixing process, as it allows you to dial in an ear-pleasing dip in backing track volume without programming envelopes or removing desirable frequencies from backing tracks with shelved EQs. It is not a magic wand, however, as envelopes and EQs are also important skills to master for nailing a solid mix. All that said, once you’ve learned sidechaining it’s likely to remain an essential and frequently-used tool in your mixing toolbox.

