If you enjoy this how-to guide and decide to grab one of the items listed, please consider clicking through one of my links before you buy. I earn a small commission at no cost to you, which helps support this site and keep these informative guides coming. Thanks!
Once a year, my wife and I create a slideshow video for my son’s birthday using pictures from the previous year. I record a song for the video, then my wife helps me pick out the perfect pictures to set to the music. It has now become a bit of a tradition, as my family and friends expect to see the annual video shared on social media on his birthday. Last year at my son’s birthday party, my wife walked around with her phone showing people the video, and I couldn’t help but notice that people were constantly turning the sound down. I can’t say I blame them, as the audio was overpowering the phone’s speaker and distorting.
This year, I want to make sure that the audio level is dialed in just right. Enter Youlean Loudness Meter, a DAW plugin and standalone app designed to help you dial in the perfect loudness level for your audio tracks to share on streaming services and social media. Today we’re going to learn how to use Youlean Loudness Meter to optimize your tracks for sharing online. As we go through our example, we’ll compare the options available in the Free and Pro versions and decide which version is right for you.
Let’s Get Loud

Youlean Loudness Meter 2 Free is available as a free download at Youlean.co. Once installed, it works as either a standalone application or a plugin for your favorite DAW. As a metering plugin, Youlean Loudness Meter doesn’t have any effect on your output sound and is fairly low in CPU use, so I have started adding it to all of my new projects on the Master track to help with gain staging during the recording process as well as with mixing mastering. Here’s how to get started using Youlean Loudness Meter step-by-step:
Step 1 – Add Youlean Loudness Meter to your Master
In your DAW, go to the Master track and add Youlean Loudness Meter as a plugin. As a rule of thumb, I make sure to keep Youlean as the very last plugin on my Master, since other plugins on the master, like limiters, mastering EQs, etc. can have a dramatic effect on the overall sound output. Putting Youlean before those plugins can give a misleading view of your track’s overall loudness.
Step 2 – Select a Preset
The free version of Youlean Loudness Meter comes with nine visualization presets in the Film-TV-Gaming category, while the Pro version unlocks nine additional presets in the Online Streaming category and allows for saving custom presets. Since my video is going to be shared on Facebook, AES Streaming at -20LUFS is probably the best setting to choose, however since I’m using the free version I’ll be using ASWG-R001 Portable, which is the closest to the AES Streaming setting at -18 LUFS plus/minus 2. Remember that the presets only stand to calculate the visualizations on the graph, so you can theoretically use any of the settings and just keep a particular LUFS value in mind when analyzing your output.
Step 3 – Playback Your Track
Once you have Youlean Loudness Meter loaded and have set a graph visualization preset, go ahead and playback your track. You’ll want to play the entire track from beginning to end to gather a complete dataset, as the idea is to make sure that your entire track falls within an acceptable dynamic range – more on that in the next step. As you play your track, you’ll see the short-term meter on the left bouncing up and down showing a 3-second average, and the histogram on the right will track the entire performance through your playback.
Step 4 – Analyze graphs
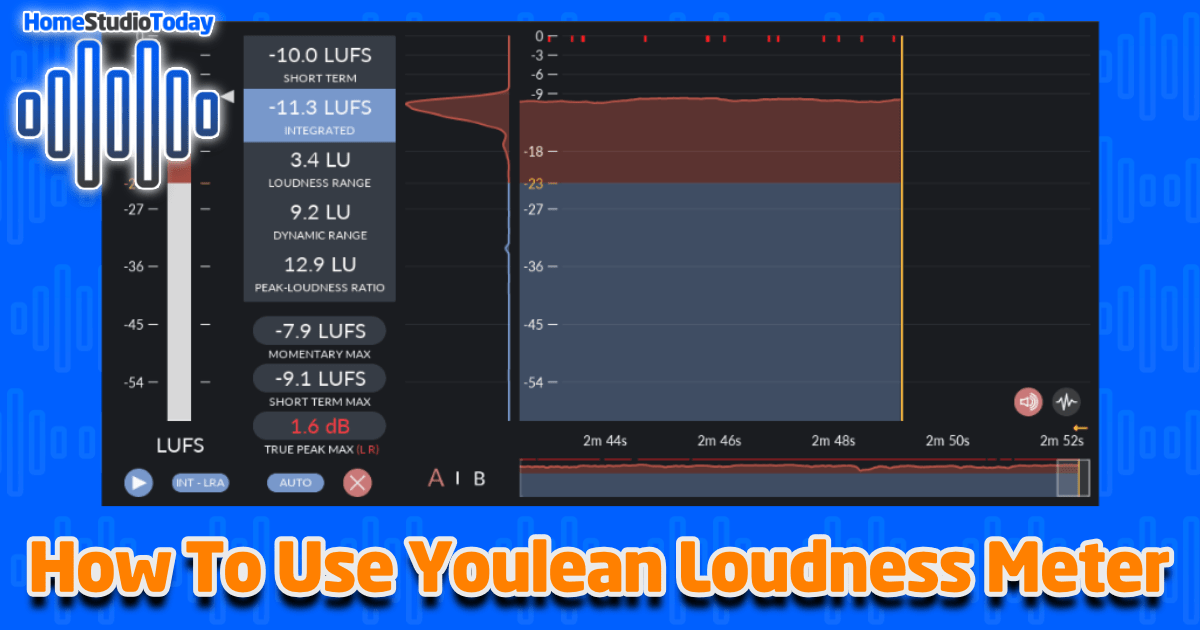
After playing back your full track, you’ll have a ton of cool data to look at. Youlean Loudness Meter gives you several important data points, all measured in Loudness Units (LU), Loudness Units relative to Full Scale (LUFS), and traditional decibels (dB). Let’s take a quick look at the different datapoints so we understand what’s happening:

Short-Term (LUFS)
Short-Term LUFS in Youlean Loudness Meter gives you a 3-second average of your loudness compared to the entire measurement. In my example, the very end of my track is a sound effect instead of instruments playing and is softer than the rest of the track, so the Short-Term LUFS is far lower than the rest of the track. The Short-Term LUFS is extremely useful during playback for catching momentary rises in overall loudness.
Integrated (LUFS)
Integrated LUFS is the main number you’ll want to study on your graphs in Youlean Loudness Meter. This number gives you the Loudness Units relative to Full Scale for your entire measurement, which in our case is the entire track from beginning to end. As you can see from my initial playback numbers, if my target for sharing my video on Facebook is -20 LUFS, my track is way too hot and will probably end up distorted once squeezed through Facebook’s audio/video compression algorithm. We’ll learn how to adjust the track in the next step.

Loudness Range (LU), Dynamic Range (LU) and Peak-Loudness Ratio (LU)
Loudness Range is the momentary max loudness minus the minimum loudness, and Dynamic Range is the true peak minus the minimum, both measured in LU. Peak-Loudness Ratio is the True Peak Max minus the Integrated Loudness. These three measurements in Youlean Loudness Meter are good for seeing just how compressed your track is, as lower values mean the track has less total dynamic range.
Momentary Max (LUFS), Short-Term Max (LUFS) and True Peak Max (dB)
These are the maximum loudness and decibel levels of the entire track or a 3-second period. These are great measurements to watch as you’re playing back your track after adjustment. If they go above your target level, you don’t have to wait until the track is over and can stop playback and adjust the track again.
Real-Time Dynamics and other Pro Features
If you have the Pro version of Youlean Loudness Meter, there’s also a very cool real-time dynamics feature that shows your track as an inverse graph, highlighting peaks and valleys in overall dynamic range. Some of the other Pro features include a manual Loudness Target, the extra presets mentioned above, tons of settings for the dynamics graph and histograms, alert settings, plus advanced settings for how the plugin behaves overall.
Step 5 – Adjust Track
Now that you have a solid measurement of your track in Youlean Loudness Meter, it’s time to make some adjustments that affect the overall output, and also to examine the meter for low or high spots that are indicative of mixing issues. You’ll want to take some time with the graph and look for any unintended peaks or valleys, but be careful not to take all of the dynamics out completely. If you’re using a limiter on your master track, you can start by adjusting the output gain, or check the trim settings to add some headroom. The same goes for mastering EQs, compressors, or any other effects on your master. Also, going back and making sure that your mix is properly gain staged can make a huge difference in how your master track behaves.
Step 6 – Lather, Rinse, Repeat
After you’ve adjusted your track, it’s time to take another measurement. Start off by playing the track for 30 seconds or so and watch your Momentary Max and True Peak Max in Youlean Loudness Meter. If they’re above your target, stop playback, adjust the track again, then measure again. Repeat this process until you hit your target.
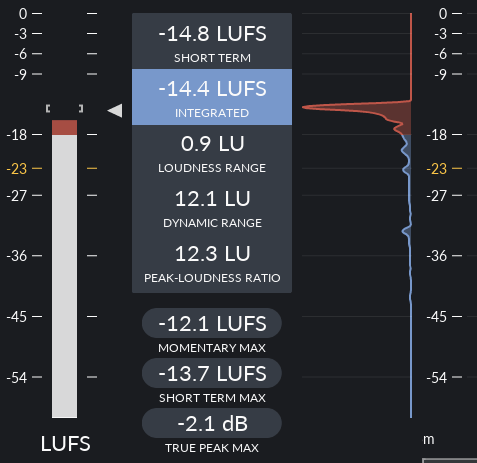
If you’ll recall, my first master was at -11.4 Integrated LUFS. I adjusted my mastering limiter and EQ, then ran the track again. Here was my first output:

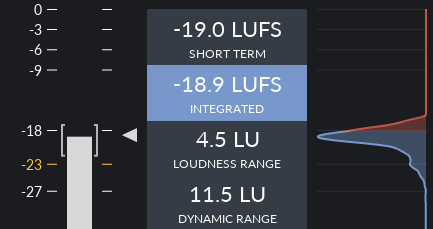
Better, but still not good enough. Adjusting the limiter and EQ allowed me to find a few individual stems that were overpowering the meter that I didn’t catch before. After adjusting compression and levels on those tracks and taking one more pass at the mastering limiter, I got this:

Now within 1 LUFS of my goal of -20, it was time to export my track and send it over Messenger to see how Facebook’s compression algorithm worked on it. When played back on my phone, It was a night and day difference in the sound quality from the first master, and ready to print and start editing the video.
The Bottom Line
Using Youlean Loudness Meter, I was able to properly set the loudness level for sharing online, and the birthday video that everyone looks so forward to will hopefully be another smashing success this year – without smashing anyone’s eardrums. I was able to get away with using the free version for this one project, but if you’re regularly mixing and mastering tracks in your studio that are uploaded to streaming or social platforms, it’s probably worth considering a Pro license to get the extra features and make sure your tracks stack up against the competition no matter where they’re played.

